Configuring with a Serial Console
A managed switch can also be configured by using a serial console. Note that a special serial console cable is required to connect to the console port on top of the RSAGS’s chassis. Please contact Welotec to obtain the cable, is needed. This method is like the web browser one. The options are the same, so users can take the same procedures as those examples in Chapter 2.
Serial Console Setup
After users install Tera Term, perform the following steps to access the serial console utility.
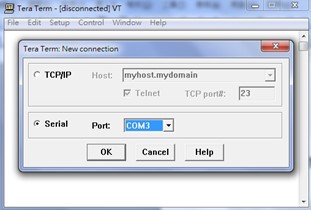
Start Tera Term. In New Connection window, select serial and appropriate port.
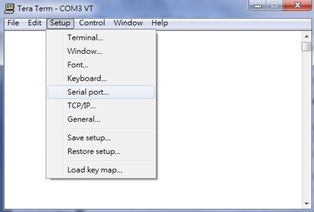
Click Setup -> Choose Serial Port.
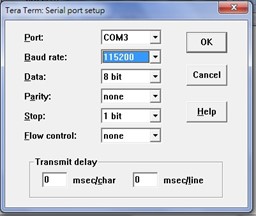
The Serial Port Setup window pops up. Select an appropriate port for Port, 115200 for Baud Rate, 8 bits for Data, none for Parity, and 1 bit for Stop, as shown in Figure 3.3.
After finishing settings and clicking OK, a Command Line Interface (CLI) will be brought up.
Command Line Interface Introduction
The Command Line Interface supports two types of privileges, which are operator and manager privileges. Users with operator privileges may only view the information, while those with manager privileges are allowed to view information and configure settings. Operator and manager privileges are initially entered without the need for passwords, but a user may be assigned witha password for both the operator and manager privileges. If passwords are assigned, then when the user attempts to enter CLI on the next time, they will need to enter the correct username and password. If a user enters the password for the operator, then the prompt changes to indicate operator privilege. User is now in the “user” mode:
Switch>
If a user enters the password for the manager, then the prompt changes to indicate manager privilege. User is now in the “privileged” mode:
Switch#
If a user is in the user mode and wants to switch to the privileged mode, he/she may simply type in the command “enable” and then enter the correct username and password after the prompt: Switch>enable.
Username: (enter username here) Password: (enter password here) Switch#
To enter the “configuration” mode, you need to be in the privileged mode, and then type in the command “configure”:
Switch# configure Switch(config)#
An illustration of the modes, related privileges and screen prompt is shown in Figure 3.4.

Users may enter “?” at any command mode and the CLI will return possible commands at that point, along with some description of the keywords:
Switch(config)# ip ? Address Set IP address and subnet mask default-gateway Set default gateway IP address dns Set DNS IP address
Users may use the <Tab> key to do keyword auto completion:
Switch(config)# syst <Tab> Switch(config)# system
General Commands
The table below shows some useful commands that may be used anytime when using serial console.
Table 3.1 Command Descriptions:
Commands |
Descriptions |
|---|---|
Enable |
Turn on privileged mode |
Disable |
Turn off privileged mode |
Configure |
Enter configuration mode |
? |
List all available option. |
Exit |
Go back to the previous menu. |
Help |
Show any available helpful information |
Logout |
Log out of CLI |
history <0~256> |
Set the number of commands to remember as history. Ex: history 5: memorize 5 previous commands. |
No history |
Disable command history |
Show history |
List last history commands |
Hostname |
Set switch name |
no hostname |
Reset the switch name to factory default setting. |
[no] password <manager | operator | all> |
Set or remove username and password for manager or operator. The manager’s username and password are also used by the web user interface (web browser method of configuration). |
Command Example
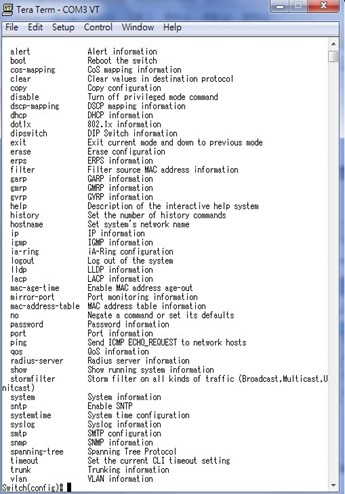
The serial console is another method to add/delete/change configuration, same as the web browser method. These two methods have similar functionalities. The picture below shows all the options on CLI. Two examples of making configurations: Administration and Spanning Tree using serial console method, which are shown in the following sub-sections, are the same as what are explained in Chapter 2. The only difference is that the web browser method is used in Chapter 2.
Administration Setup using Serial Console
This section shows how users can find the administrative information and make changes using commands. Detailed explanations of each technical term can be found in Chapter 2 of this manual.
Table 3.2 Descritpitons of Administrative Commands for Setting Up:
Command |
Description |
|---|---|
sntp |
\ afterutc><0 ~ 24 hours> |
[no] dhcp |
Enable or disable DHCP |
show dhcp |
Shows DHCP status |
ip address |
Set IP address and subnet mask |
Ip default-gateway |
Set the gateway IP address |
show ip |
Show IP address, subnet mask, and the default gateway |
Boot |
Use this command to reboot the switch |
Show running-config |
Display the running configurations of the switch. |
copy running-config startup-config |
Backup the switch configurations. |
erase startup-config |
Reset to default factory settings at the next boot time. |
Show arp |
Show the IP ARP translation table |
Ping ip-addr<1~999> |
Send ICMP Echo-Request to the network host. <1 ~ 999> specifies the number of repetitions. |
Exec |
Switch to shell mode. Shell mode may do shell command. |
Spanning Tree Setup using Serial Console
This section shows how users can see spanning tree information and make changes using commands. Detailed explanations of each technical term can be found in Chapter 2 of this manual.
Table 3.3 Descriptions of Commands for Setting up Spanning Tree:
Command |
Description |
|---|---|
[no] spanning-tree |
Enable/disable spanning-tree |
Spanning-tree forward-dalay<11~30> |
Set the amount of forward delay in seconds. |
Spanning-tree hello-time<1~10> |
Set hello time in seconds |
Spanning-tree maximum-age<6~40> |
Set the maximum age of the spanning tree in seconds |
Spanning-tree priority<0~61440> |
Set priority of the spanning tree bridge |
Spanning-tree port path-cost <0 ~ 2E8><port #> |
Set path cost for a specific port |
Spanning-tree port priority <0 ~ 240><port #> |
Set priority to a specific port |
Show spanning-tree |
Show spanning-tree information |
Show spanning-tree port <port #> |
Show port information |
[no] spanning-tree debug |
Enable or disable debugging of the spanning tree |
Spanning-tree protocol-version <stp/retp> |
Choose protocol version. A detailed description of stp/rstp can be found in section Spanning Tree of chapter 2 |
[no] spanning-tree port mcheck<port#> |
Force the port to transmit RST BPDU. |
[no] spanning-tree port edge-port <port #> |
Set the port to be edge connection. |
[no] spanning-tree port non-stp<port#> |
Enable or disable spanning tree protocol on this port. |
[no] spanning-tree port point-to-point-mac <auto | true | false><port #> |
Set the port to be point to point connection. |